
Academy Sports + Outdoors
Academy, LTD
 Gift Cards
 Hot Deals
 Big Fun Deals
 Clearance
How to Sight in a Red Dot: Zero in Your Scope Like a Pro
WriterAubrey McShan
12 min read
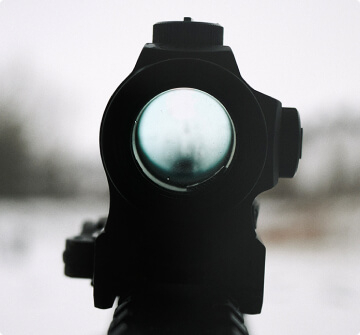
Want a competitive edge with your new red dot? Whether you’re shooting at the range or hunting in the woods, sighting in a red dot allows you to fine-tune its alignment — resulting in improved accuracy and target acquisition.
In this guide, you’ll learn all about the process of sighting in a red dot. Zero in on your target swiftly and efficiently while conserving valuable ammunition like a pro!
Key Takeaways
- Learn how to sight in a red dot by gathering your supplies, verifying your adjustment value, firing rounds, and repeating the process.
- Discover the how to sight in a red dot with step-by-step instructions and expert recommendations.
- Find out how to sight in a red dot scope without shooting so you’re prepared to sight in a red dot whenever and wherever.
- Understand key terms to know when learning how to sight in a red dot and what each term means.
How to Sight in a Red Dot (Simple)
While it’s possible to sight a red dot without any extra equipment, sight adjustment tools come in handy and are there if you need them. Follow our steps to help master the art of sighting in a red dot:
-
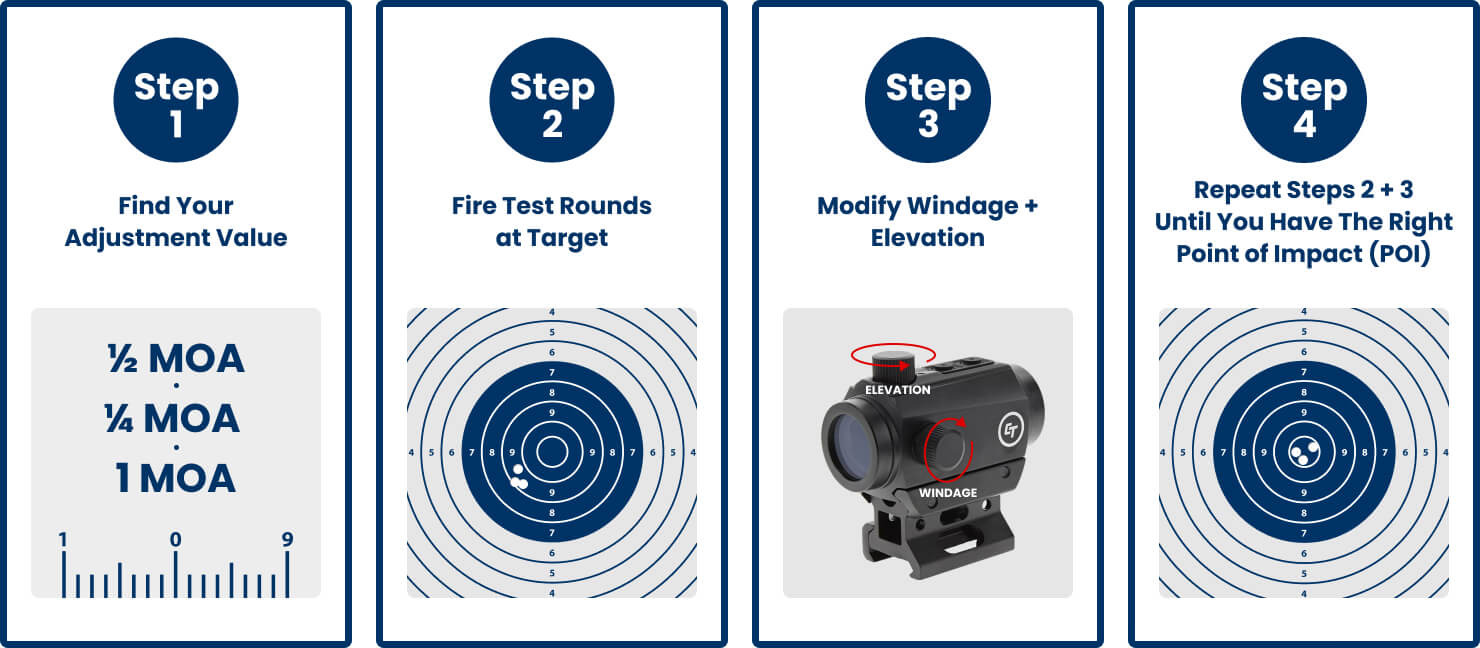
Step 1: Safety First + Gathering Your Supplies: Before you can begin sighting a red dot, ensure you have a paper target, a red dot sight with an adjustable parallax knob, and the ability to see through your barrel to the target.
-
Step 2: Verify Your Adjustment Value: Since you’ll need to make adjustments after you fire your rounds, you’ll need to know the click value on your red dot. A ¼ MOA or 1 MOA is common.
-
Step 3: Fire Rounds: Fire up to five rounds at the center of your target. Walk over to the target to inspect where the pellets hit. You can make further adjustments in the following step.
-
Step 4: Modify Windage + Elevation: Adjust the turrets so the point of impact (POI) matches the point of AIM (POA). Most red dot sights have quarter, half, or 1 minute of angle (MOA) clicks. Repeat the process as necessary until your POA and POI are aligned.

Sighting in a Red Dot (Step by Step)
When it comes to sighting in a red dot sight, understanding the adjustment dials located at the 12 o'clock and 3 o'clock positions is key. The 12 o'clock dial controls elevation. The elevation dial allows you to adjust the sight up and down. The 3 o'clock dial handles windage. Windage is how you can fine-tune the sight side to side.
Expert Tip:
If you move your turret dial-up, the reticle will move down. If you move it left, it will move right, and vice versa. Keep this in mind when you make adjustments.
Step 1: Safety First + Gathering Your Supplies
Before you ever handle your firearm, ensure you’ve followed the basic (and important) gun safety rules. Doing so means you can safely handle your weapon without risking injury or worse for yourself or those around you. Now, here are some of the supplies you’ll need or things to do before you begin:

-
Prepare the Barrel: Split the upper receiver from the lower. Remove the charging handle and bolt carrier group to ensure clear visibility through the barrel.
-
Use a Gun Stabilizer: Use a gun vise (like the Tipton Gun Vise) or other stabilizing tools. Sandbags, bench rests, or bags can also keep the firearm steady during the sighting-in process.
-
Buy a High-Contrast Target: Set up a high-contrast target. This might be a cardboard target or a purchased paper shooting target. If you are using a target without any markings, you can draw an inch point of aim (POA) in the center with a sharpie.
-
Have Enough Space: Make sure you have a suitable shooting area with at least 10 yards of space (although we recommend 50 yards).
-
Use Your Parallax Knob: Ensure your red dot sight or scope has an adjustable parallax knob to eliminate parallax error. Some scopes may have fixed parallax settings.
Step 2: Verify Your Adjustment Value
-
Know the Click Value: Familiarize yourself with the click value on your red dot sight. The click value indicates how much the point of impact (POI) will change with each adjustment click.
-
Common Click Values: The most common click value is ½ MOA. Each click will result in a ½-inch change in point of impact at 100 yards. Other alternatives include ¼ MOA or 1 MOA adjustments.
-
Check Your Manual: Check the manual or specifications of your specific red dot sight to confirm its click value.
Step 3: Fire Rounds
-
Fire 3-5 Rounds: Fire 3-5 rounds. Next, aim for the center of the target.
-
Inspect and Analyze: After firing the rounds, carefully inspect the grouping of the shots on the target. Analyze the positioning of the grouping in relation to the center of the target to determine the necessary adjustments for improved accuracy.
Step 4: Modify Windage + Elevation
-
Adjust Elevation and Windage: Ensure that your POA matches your POI by adjusting the elevation and windage accordingly.
-
Consider the Adjustment Value: If you are shooting at a range of 50 yards instead of the standard 100 yards, make adjustments for elevation and windage by cutting the adjustment value in half. The most common yard zero is the 50/200 yard zero.
-
Fire and Repeat: Fire your shots, observe the impact on the target, make necessary adjustments to the red dot sight, and repeat the process until the desired POA and POI alignment is achieved.

How to Sight in a Red Dot Scope Without Shooting
If you’re in a scenario like a competition where you can’t shoot but still need to sight in a red dot, follow these steps:
Laser Boresighting Your Red Dot Scope
The laser boresight is a tool utilized to align the firearm barrel and sight prior to shooting. By projecting a laser beam onto a specific target point at a designated distance, it allows for precise alignment of the aim point with the firearm's bore.
-
Step 1: Set Up at the Correct Distance: Perform the boresighting process at a distance of approximately 10 yards from the target.
-
Step 2: Insert the Boresight: Insert the boresight device into your rifle's chamber and close the bolt securely.
-
Step 3: Aim at the Target: Aim your gun directly at the target. You should be able to see the red dot projected by the boresight device on the target.
-
Step 4: Make Adjustments: Utilize the turrets on your firearm's sight to make adjustments, aligning the red dot with the laser point and ensuring proper targeting.

Sight in a Boresight With Your Naked Eye
Boresighting helps your rounds land on the paper target, which makes zeroing in your rifle much easier.
-
Step 1: Prepare the Rifle: Separate the receiver, remove the bolt carrier group, and remove any caps or covers on the turrets to ensure easy adjustment.
-
Step 2: Secure the Rifle: Prop up your rifle securely on a bag or bipod — ensuring it stays in place during the boresighting process.
-
Step 3: Center the Target: Look down the barrel of the rifle and ensure that the center of the barrel is pointing directly at your target.
-
Step 4: Observe the Reticle: Look through your scope and note where the reticle is pointed in relation to the target.
-
Step 5: Adjust the Turrets: Use the turrets on your scope to make adjustments based on the deviation between the barrel alignment and the reticle.
Key Terms to Know When Sighting in a Red Dot
If you’re new to the shooting world, then you may have never heard of half these terms. Learn the abbreviations below to make sighting in a red dot easier!
-
Zero is another way of saying “to sight in a red dot”.
-
POI stands for point of impact.
-
POA stands for point of aim.
-
MOA stands for minutes of angle. 1 MOA equals 1 inch at 100 yards.
Have Fun Out There!
Ready to aim on target with the help of your red dot? Whether you’re hunting bucks in the woods or practicing at the range, a red dot can ensure your POA and POI are aligned. At Academy, we carry a variety of red dot sights, including holographic and reflex sights for enhanced aim and accuracy!